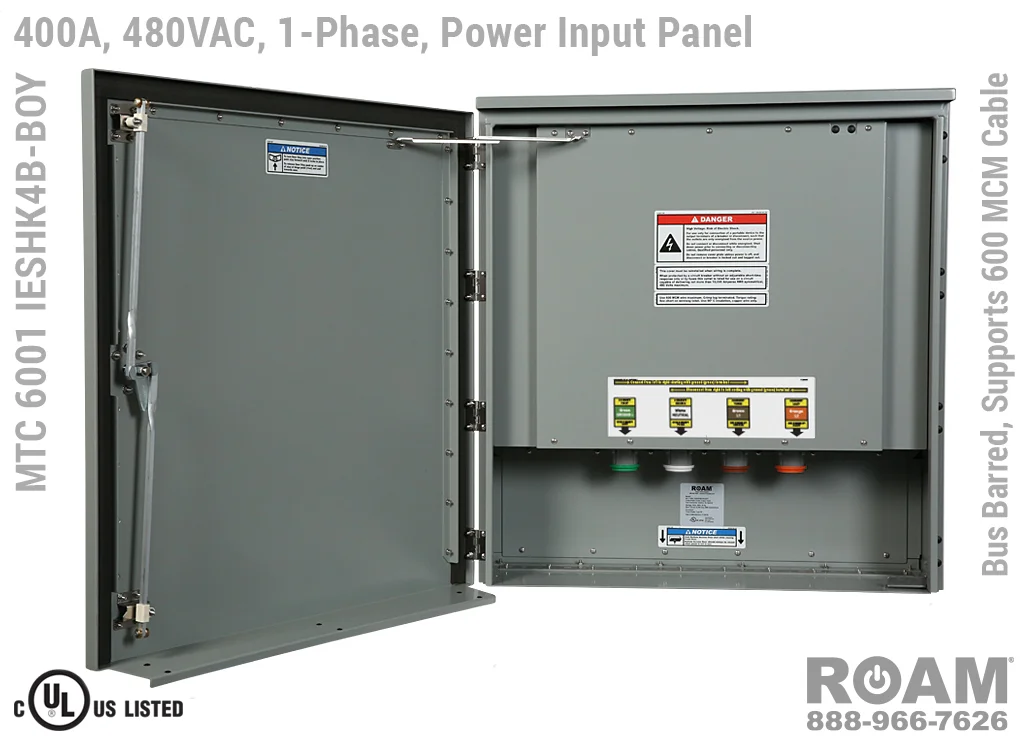
When a power outage hits, the primary objective is to restore “mission-critical” loads refrigeration, security systems, or medical equipment without compromising the safety of the electrical grid. A Generator Interface Panel (also known as a generator docking station or tap box) serves as the permanent access point for your backup power.
Unlike a makeshift connection, an interface panel is a wall-mounted, weather-rated enclosure that contains high-amperage connection points. It acts as the “handshake” between the building and the generator, ensuring that the two power sources can never be connected simultaneously.
What is an Interface Panel vs. a Standard Transfer Switch?
While a Manual Transfer Switch (MTS) or Automatic Transfer Switch (ATS) handles the actual “flipping” of the power source, the Generator Interface Panel is the physical entry point. In many modern commercial setups, these two are integrated. The panel allows you to use standard Cam-Lok cables to “plug in” a large portable generator quickly, which is essential for businesses that don’t have a permanent standby unit but have a rental agreement for emergencies.
The Danger of Backfeeding: Why Direct Connection is Never an Option
The most dangerous mistake in backup power is “backfeeding.” This occurs when someone connects a generator to an appliance outlet (using a “suicide lead”) or directly to a breaker without a master disconnect.
If your main breaker is not physically isolated, your generator will attempt to power the entire neighborhood. The transformer on the pole will step that voltage back up to thousands of volts, creating a “hot” line that can kill utility workers trying to restore your power. Furthermore, when the utility power eventually returns, it will collide with your generator’s out-of-phase current, resulting in an explosion or catastrophic fire.
Understanding NEC Article 700 and 702 Compliance
In the United States, the National Electrical Code (NEC) strictly regulates these connections:
- NEC 700: Covers Emergency Systems (Life Safety).
- NEC 701: Covers Legally Required Standby Systems.
- NEC 702: Covers Optional Standby Systems (most residential and small business setups).
A compliant installation requires a “break-before-make” transition, ensuring the utility is fully disconnected before the generator takes the load.
Step-by-Step: Connecting Your Generator via an Interface Panel
Follow these professional steps to ensure a safe transition to backup power.
Step 1: Assessing Total Load and Phase Matching
Before connecting, you must know your running wattage and starting wattage (surge).
- Running Wattage: The continuous power needed for lights and electronics.
- Surge Wattage: The extra “kick” needed to start motors (AC units, pumps).
- Phase Alignment: Ensure your generator matches the building’s service (e.g., Single Phase 120/240V or Three Phase 208V/480V). Connecting a single-phase generator to a three-phase interface panel without proper configuration will lead to equipment failure.
Step 2: Mounting the Quick-Connect Docking Station
The interface panel should be mounted on the exterior of the building near the electrical service entrance. This allows the generator to remain outside, preventing Carbon Monoxide (CO) poisoning, which is a leading cause of death during outages.
Professional panels use Series 16 Cam-Lok connectors. These are color-coded (Black, Red, Blue for phases; White for Neutral; Green for Ground) to ensure that even in a high-stress emergency, the connections are made correctly.
Step 3: Engaging the Mechanical Interlock
Once the cables are seated and locked, you move to the transfer switch. A mechanical interlock is a physical slider or bar that prevents the “Generator” breaker and “Main” breaker from being “ON” at the same time.
- Turn off all high-draw individual branch breakers.
- Slide the interlock to the “Main Off” position.
- Switch on the “Generator Main” breaker.
- Gradually re-engage branch breakers one by one to avoid stalling the generator.
Essential Safety Hardware: Cam-Lok Connectors and Color Coding
In the world of Generator Interface Panels, speed and safety are achieved through standardized color coding. Using these prevents “cross-phasing” and grounding errors:
- Green: Ground (Always connect this first and disconnect last).
- White: Neutral.
- Black/Red/Blue: Hot Phases.
These connectors require a “turn-and-lock” motion. This ensures the cable cannot be accidentally pulled out while under load, which would cause a massive electrical arc.
Common Installation Mistakes to Avoid
- Undersized Conductors: Using 10-gauge wire for a 50-amp load will cause the insulation to melt and start a fire. Always size your wiring according to the ampacity of the generator’s maximum output.
- Indoor Operation: Never, under any circumstances, run a generator in a garage, basement, or near an open window.
- Improper Grounding: If your generator has a bonded neutral, but your building also bonds the neutral to the ground, you may create a “ground loop” that trips GFCIs or creates a shock hazard on the generator’s frame. Consult a licensed electrician to determine if you need a Switched Neutral transfer switch.
FAQ: Frequently Asked Questions
Q: Can I just use an interlock kit instead of a full interface panel? A: For small residential setups, a UL-listed interlock kit is often sufficient and code-compliant. However, for commercial buildings or any setup exceeding 50 Amps, an interface panel with Cam-Loks is safer and easier to use during an emergency.
Q: Does a generator interface panel protect against surges? A: No. The panel is a connection point. To protect sensitive electronics, you should have a Type 1 or Type 2 Surge Protective Device (SPD) installed in your main distribution board.
Q: How far away should the generator be from the building? A: Most manufacturers and safety boards (like the NFPA) recommend a minimum of 20 feet from any building openings (windows, doors, vents) to prevent exhaust fumes from entering.